Friday, November 29, 2013

Snowflake Hat

 I think this is my favorite hat I have made so far. The love the contrast between the red and white. And who can resist pom-poms? I made this based on a hat that I saw on Pinterest.
I used the basic hat pattern used on the Hello Kitty hats, but added pom-poms in place of the braids (can you tell I'm loving pom-poms right now?). For the applique I used the Star Snowflake pattern. I modified the pattern by using worsted weight yarn and a size G hook.

Hug-a-Monster

 This is my first amigurumi project. I think she turned out pretty cute.  I called it a Hug-a-Monster and gifted it to a little friend who needs lots of hugs. I added a heart around the eye (instead of a circle) and added cute pom-poms to make it more girly.
Pattern from CraftBits.

Hello Kitty in Purple

 Our little friend/neighbor was recently diagnosed with leukemia. She has started loosing her hair because of the chemotherapy. Her mom mentioned she like Hello Kitty, and that her favorite color is purple. So, of course I had to make a purple Hello Kitty hat for her. I hear she loves it!

Wednesday, February 27, 2013

Minnie Mouse Crocheted Hat


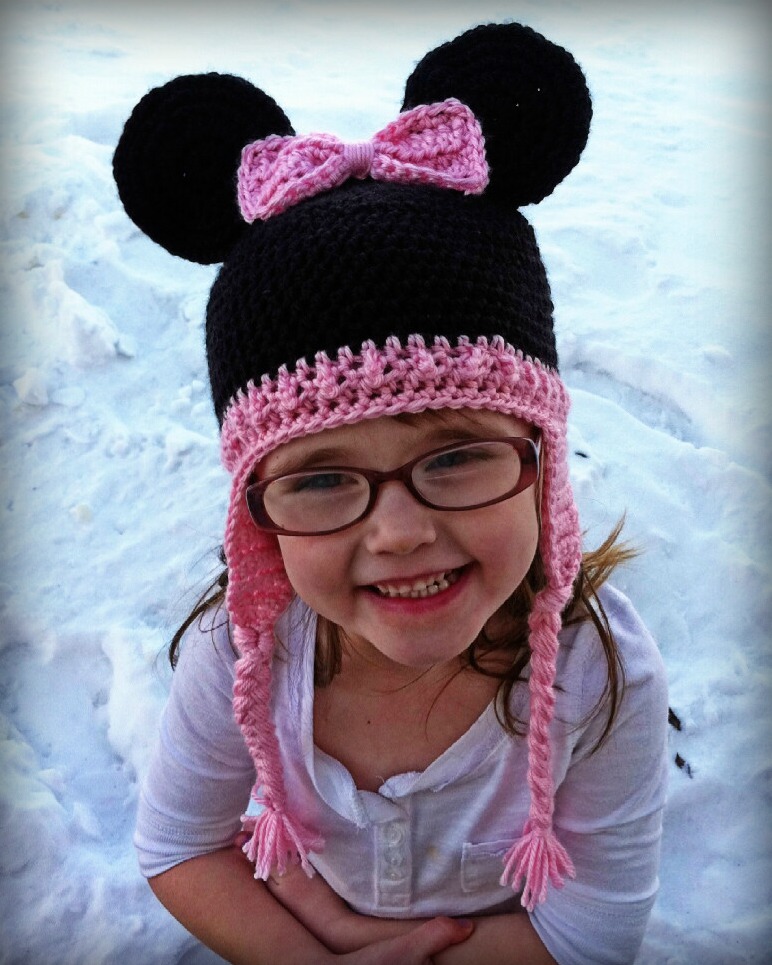
I made this Minnie Mouse hat for a cousin's little girl who loves to watch Mickey Mouse Clubhouse. I used the basic hat pattern from the Hello Kitty hat with a little bumpy stitch added for fun, then added the ears and bow inspired by this pattern. I think it turned out so cute and I hope the new owner will like it, too!

Monday, November 5, 2012

Siamese Cat Hat

E loves her cat. LOVES. After I made Miss A the Hello Kitty hat, she requested a cat hat, too, but could I make it look like her cat? We searched Ravelry to see what was out there, and what do you know! There was the perfect pattern! She asked that instead of making the eyes blue, could I please make them purple (her favorite color). The first hat I made I used the hat pattern from Hello Kitty, and the other elements from the Siamese Cat pattern. She LOVED it, and wore it NON STOP. The only time she ever took it off was at school (they aren't allowed to wear hats at school). But, she took it with her and wore it to and from. One sad, sad day the hat fell out of her bag on the way into school, never to be seen again. You would've thought her real cat had died for all the tears she shed. I promised her I'd make another one. This time I used the hat pattern from the Siamese Cat. It's a little too big, but she doesn't care. My only problem with this pattern is the eye size. It has instructions for small eyes (to be used on baby size hats) and large eyes. The large eyes seemed to big and the small eyes seemed too small. I let E decided what size eyes she wanted, and she chose the small. When I have the brain power to think about it, I'll have to see if I can make some that are in between. I also should have sewn on the ears in a curved line instead of a straight line. I think that would make them stand up. Right now they flop flat back. Ok, there is one more problem that I have with this hat. E wears it all the time. ALL. THE. TIME. Really, it's a bit of a problem. She even created her Halloween costume around it. At least I know she likes it. That's a huge understatement.  Siamese Cat hat pattern from Crochet by Jennifer found via Ravelry.

Monday, October 8, 2012

Owl Hat


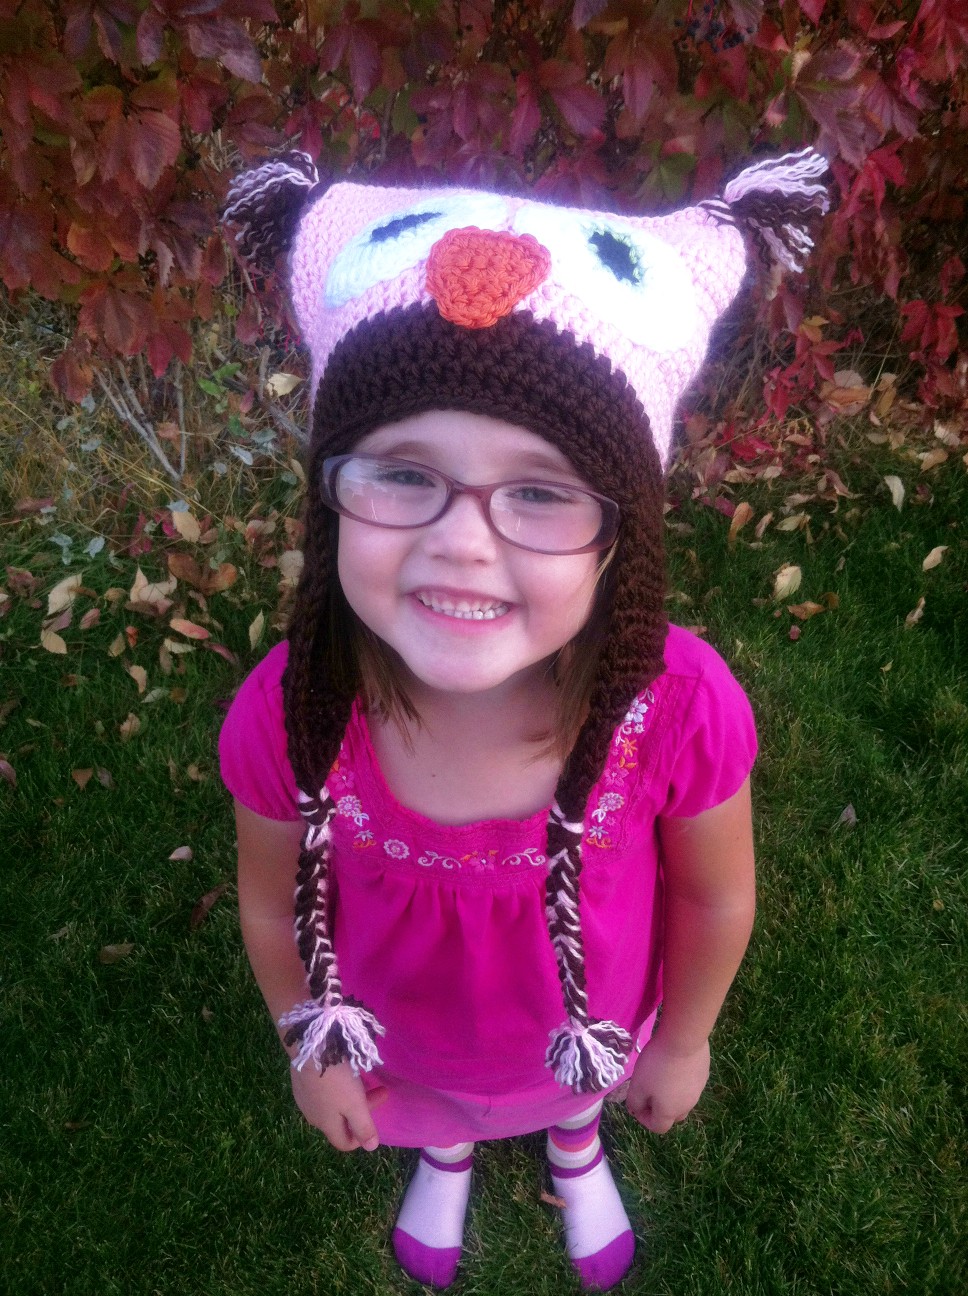
My cousin requested an owl hat for her daughter who is the same age as Miss A (and sometimes I think the same person). I couldn't decide on one pattern, so I took what I liked from several different patterns that I found online and came up with what you see here. I think it turned out pretty cute. Maybe next time I won't make the ear flaps as long. Or maybe I'll leave off the braids and put pom-poms at the bottom of the flaps instead. The body of the hat and beak came from Slugs On The Refrigerator and can be downloaded here on Ravelry. If you're not a member of Ravelry you can join for free. I highly recommend it! You can find every pattern for anything you could imagine wanting to make.

Friday, September 14, 2012

Hello, Hello Kitty!


Miss A likes Hello Kitty. A lot. I found this cute crocheted Hello Kitty hat pattern and whipped one up for her. It was so easy, and turned out so cute, I made another for my cousins daughter who likes Hello Kitty even more than A.  Pattern from Crochet in Color found via Ravelry.

Tuesday, July 31, 2012

All Star Crochet Blanket


When I saw a picture of this block from the All Star Crochet Blanket on Pinterest, I wanted to make it. I had never seen anything like it. I have a good friend who's birthday is in July, and she happens to love the 4th of July Holiday. I decided this would be a great gift to make for her. It wasn't hard, but it did take time. It took me about 2-3 months to complete (I've forgotten exactly). The pattern gave instructions for how to crochet and join as you go, but for the life of me I couldn't figure that part out. So, I completed all the blocks then joined them. Blocking the blanket after it was all put together made a HUGE difference.  It turned out great, and my friend loved it! The pattern is found in the book Crocheted Gifts: Irresistible Projects to Make & Give. I found it in our library.

Tuesday, May 8, 2012

Hats, Hats & More Hats

Some ladies in my church have been knitting and crocheting hats to donate to charity. I chose to crochet my hats, because I'm much better and faster with the hook than with knitting needles. My goal was to crochet 10 hats. I was able to finish 13 hats before the collection day.

Baby Teething Biscuits

Baby Teething Biscuits that I crocheted using the leftover cotton yarn from the Newborn Elf Hat. What a brilliant idea! Dampen the buscuits, put in the fridge for an hour or two. Then, let the small person chew to their little hearts content to help sooth sore gums.
UPDATE!! Pattern can be purchased HERE found via Ravelry.
 Here is similar pattern for FREE (I haven't tried it).

Newborn Elf Hat

I crocheted this newborn elf hat as a baby gift for a good friend. She picked out the cute aqua and orange yarn to match a baby blanket she made . I love this hat. It's so cute, and quick to make up.
Pattern from Oodles 4 Noodles.

Friday, April 29, 2011

Favorite Tools: Pencil Box


This pencil box was a gift from my Auntie Annie, many years ago.  It's made of cedar wood and smells wonderful every time I slide open the lid.  As an art major in college, this went everywhere with me.  In fact, everything currently held inside, are things I used every day in classes.  See that blob of rubber eraser?  They're usually a nice grey color, even after many uses.  It's hard tell in the picture, but it's pure black.  Not a speck of grey in sight.  In one art class in particular, we did a lot with charcoal.  The poor eraser never recovered.  It's still as stretchy as ever, though. Sadly, this pretty little box has been packed away for too many years.  It's time for it to find a special place, next to my other favorite tools.

Wednesday, April 27, 2011

Cable Knit Hat

I forgot to make note of when I started this hat, but I’ve been working on it for a few months, a little at a time. It’s the first thing I’ve knitted in the round. I like how it looks, and I learned how to do a double decrease. The only thing I would change is I would make it a little longer. I wanted a hat that would cover my ears, but this doesn’t quite make it. I was so happy to finish it, that I was not about to frog it halfway to make it longer. Maybe I'll give it to iBob and I’ll make another one for me!

E's Birthday Scarf

I made this scarf for E's Birthday in January.  It's knitted from a yarn called Pomp-la-Doodle.  I found this “yarn” a little tricky to cast on. It took some getting used to, but was easy to knit. It hides mistakes well. :) This pattern said it makes a short scarf at 35 1/2” long. However mine ended up being 32” long, using the whole ball. I even knit a little tight, so I thought it would have been a little longer. It’s a bit too short for me, but thankfully E loved it!

Friday, April 8, 2011

Basket Weave Blanket

This was my first EVER "thing" I knitted.  It's been done for over a year, and I finally got around to taking a picture of it.  It was a good practice in knitting and purling.  I got the pattern from the Lion Brand website, but made it on a much smaller scale.  It fits perfectly on Bubble's doll bed.  There are mistakes in it, but I don't care.  And neither does the doll, who is currently snuggled under it.

Kids Duffel Bags


I saw this tutorial on making a Retro Duffel Bag.  I decided to make one for Bubbles and JB.  I thought it would be perfect for a weekend trip to Grandma & Grandpa's.  I made mine bigger than in the tutorial so it would hold all their clothes for the trip.  I wanted to use up some fabric from my stash, but didn't have any heavy weight fabric that I wanted to use for this project so I used some heavyweight craft fusible interfacing.  It was a pain to work with, but in the end I'm glad I used it.  the duffel's are very sturdy.  I also used the tutorials instructions on making your own handles, again using stash fabric.  The only thing I would add, if making one again, would be to add a little loop pull tab at either end of the zipper.  It would make it easier to zip open and closed.  It seemed like it took forever to get them done, but that was because I only had a few minutes at a time to work on them..  In actuality, they came together quite quickly.  Tutorial on Saltwater Kids found via MADE.

Thursday, April 7, 2011

Favorite Tools: Stapler

I know that no one reads this blog but me, but I felt like making a section on this blog called "Favorite Tools".  One of my favorite tools in my studio is my PaperPro Prodigy Stapler.  It's amazing!  I can EASILY staple through 25 sheets of paper using one finger!  REALLY!  Lulu loves to use it when she makes her handmade notebooks (fancy paper cover with sheets of plain paper inside all stapled together).  There is no way a regular stapler would be able to handle that.  Now it's hard for me to use a standard ol' stapler that you have to fist pound in order for the staple to get through 3 sheets properly.

Monday, March 14, 2011

Josh's Fire T-shirt

Birthday present #5 for the month was for my nephew.  I used a scrap of fire fabric and used a clip art fire banner. I drew the design on tissue paper, then pinned the tissue paper, T, and fabric together. I stitched right on top of the tissue paper, then tore the paper away after stitching.  I thought the tissue paper would easily tear away (which it did), but it left little tufts of paper under the stitches in some spots.  I thought it would wash out just fine, which it didn't.  I ended up having to pull out the tufts by hand with tweezers.  I stitched around the flames in black, and then again in orange.  I also stitched around the neck and arm hem in both black and orange.  After trimming away the excess fire fabric I then ironed on thin interfacing to cover up the itchy fabric edges and stitching.  I think I turned out well, and made a big hit (from what I heard).

Lauren's Crocheted Headband

The other half of my niece's present was this cute headband, modeled by Bubbles. I crocheted it using this headband pattern and this flower pattern.  It went together very quickly (less than 30 minutes).  I love how it turned out, and now want to make one for Bubbles and her Big Sis.

Lauren's Zippered Pouch

Birthday present #4 for the month is a zippered pouch for my niece.  I used this tutorial, and embellished the front with an "L" in a reverse applique (there are many tutorials online, but I just winged it).  It was quick to put together, and I really like how it turned out.  Next time I would add a little loop on a top corner to add a carabiner to so it could be clipped to a backpack or belt loop.